
Version Control#
Version control is a powerful way to organize, back up, and share your research outputs and methodologies (code + data) with collaborators, or the public at large. A version control system keeps track of a set of files and saves snapshots (i.e. versions, commits) of the files at any point in time. Using version control allows you to confidently make changes to your code (and any other files), with the ability to roll back to any previous state.
Introduction to Git#
Git is one of the most popular version control systems in use today. It has a native command line interface but there are also many third party desktop GUI (Graphical User Interface) clients that help make it easier to get started with Git. A comprehensive list of several freely available Git clients is available here. Online Git services like GitHub, GitLab, or BitBucket allow you to store your repository online and access it anywhere with a free account.
In this tutorial, you’ll learn how to set up a local Git repository, i.e. inside your Marble JupyterLab environment, to version control your work, and how to connect that repository to an online service to backup and share your work (for this tutorial, we will use GitHub as an example).
Setting up Git on Marble#
In this step you will configure the local “git” program that will actually do the version control work for you. You will also configure it to connect to your remote repository (optional, but highly encouraged step).
Caution
Depending on the JupyterLab image that you have selected, the git command line client or the GUI may or may not be
installed.
To check if the git client is installed, open a terminal and type the git --version command.
To check if the GUI is installed, look for the git icon on the left-side menu.
If either are not installed, you will have to choose a different JupyterLab image to use git.
Creating a Local Repository#
Navigate to the directory that contains your analysis or project and for which you want to implement version control. For example, if
your writable-workspace directory contains three project folders named project_A, project_B, project_C etc. and you want to
initialize version control for project_A then navigate to that directory.
Caution
While you can configure a single local Git repository for all your data on Marble by initializing that repository in the writable-workspace
directory, we strongly recommend that you initialize repositories on a per-project basis. This will make it easier for you
to track changes that affect that project only, and it will make sharing easier by allowing you to only share the analysis
that you want, without exposing the work you are doing for any other project.
To continue with Git setup, choose one of the options below:
Setup Git Repository Using the Graphical User Interface#
This section shows how to setup a Git repository using the built-in GUI, to see how to setup using a terminal see here. On the left sidebar click the Git icon. If there is no Git repository already set up you will see the following:
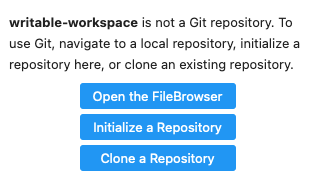
Click Initialize a Repository to create a Git repository in the current folder. Once this is done, the left sidebar will show the Git interface. This is where you will see changes to files in the Git folder.
Setup Git Repository Using the JupyterLab Terminal#
This section shows how to setup a Git repository using the built-in terminal. If you prefer to use a graphical interface, see this section instead. Click the Terminal button from the a new “Launcher” page, as shown below, (or go to File → New → Terminal) to start a Terminal session.
![]()

Navigate into the notebook_dir directory.
cd /notebook_dir
You should see the user folders available to you. These are the same folders seen when clicking the File Browser icon.

Navigate into the writable-workspace folder, then navigate to the project folder of choice, in this example project_A.
cd writable-workspace/project_A
Or, if you don’t have a project folder, create a new folder, then cd into it. Substitute your-folder-name in the code snippet below with a name appropriate for your project.
cd writable-workspace

mkdir your-folder-name

cd your-folder-name
To initialize your Git repository, type the following command:
git init
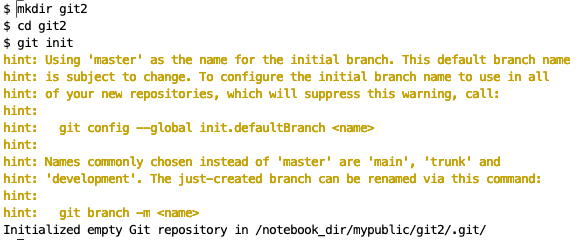
The output shown in the screenshot above confirms that a new empty Git repository was initialized.
Adding a Remote Repository#
Note
For this step, you will need an online (remote) Git repository. If you don’t already have one, and if you unfamiliar with creating one, then go to the GitHub section and follow the steps there.
You can optionally add a remote repository. Adding a remote repository allows you to store your work online at GitHub and access it anywhere. You can add a remote
repository for the local repository you created in the previous step by clicking on Git in the menu bar and then selecting Add Remote Repository. Enter the URL of the remote repository on GitHub into the Add Remote Repository dialog box. Click OK. If you
prefer to use the terminal, then navigate to your Git repo folder and issue the following command:
git remote add origin url-of-your-git-repository
Cloning an Existing Repository#
Cloning a repository is another way of adding a remote repository. Cloning creates a copy of an existing remote repository in your local folder.
Find a repository online you want to clone and copy the URL of the repository.
Create a new folder or navigate to the folder you want to keep this repository in.
Click the Git Clone button in the breadcrumb menu

Note
This button is only active when you are in a folder that does not contain a git repository.
Paste the repository URL into the dialog box. Click Clone. The online repository’s files will be copied into the local folder which will
then be initialized as a local Git repository and the remote repository will automatically be configured to be the one from which you cloned.
Using Git with the Graphical User Interface#
By default when you create a new repository you will be using a default branch, which is usually named main. This is the main branch where the initial work files will be pushed to and also where the final work version will be.
It is good practice to create work branches from the main branch where all the changes to your work will be done. Once the changes are complete they can be pushed and merged with the main branch
Making Your First Commit#
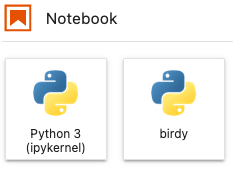
Start by creating a file. In this example a Jupyter Notebook file is created by clicking one of the Jupyter Notebook buttons in the launcher.
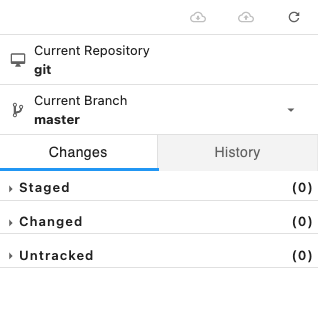
When the file is first created, it will be seen under the Untracked section in the Git sidebar. This means that you have not yet told Git to “track” changes to the file.

Staging a File#
Staging a file means adding the file to a list of files that will be included the next time a commit is made.
There are two ways to do this.
Hover the mouse over the file and click the plus
+symbol next to it. This Stages the file.
Right-click the file and select
Stage.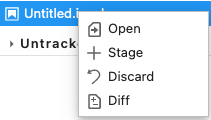
The file will now appear under the
Stagedsection.
Making a Commit#
Select the file (you can also select multiple files; here, we only have this example file) and fill in the Title/Summary for the commit. It should be short and descriptive.
It can be as simple as “Updated Untitled.ipynb” or more specific, such as “Added visualization for rainfall 2022”.
A description is recommended but is not required.
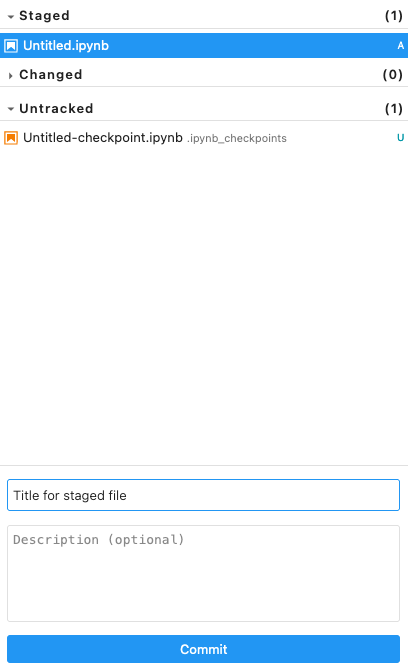
When done click the Commit button below the commit description. If successful you will see a Committed changes status pop up in the lower right corner.

Pushing a Commit#
Making a commit sets a “flag” in the progress of your work that shows what has been done at certain points. Pushing a commit moves these changes to the remote repository (if you’ve also setup a remote repository).
Click the Git menu and Push to Remote
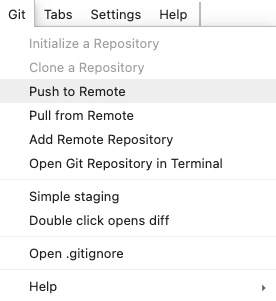
Enter in your login credentials. For the password enter your Personal Access Token. Click OK.
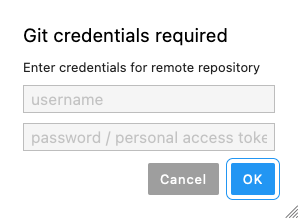
If successful you will see a Successfully pushed status pop up in the lower right corner.

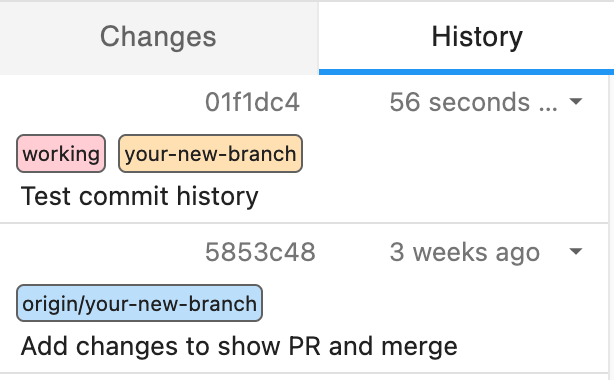
View Commit History#
To see all your past commits click the History tab in the Commits section under Current Branch
Each commit is identified with the name of the user who made it and the commit tag. A commit tag is the first few characters of a unique cryptographic hash of your commit.
In the example below, the commit tag of the first commit is 01f1dc4. The name of the user has been removed from
the image to protect privacy.
View the Changes Made to a File Between Versions#
There are several ways to view the changes made between versions of a file.
Right-click on the file and select
Diff.Click the
Diffbutton.
Enable the double-click shortcut for viewing a
Diff.From the
Gitmenu select “Double click opens diff”. A checkmark will appear to show this option is enabled. Then double-click on the file.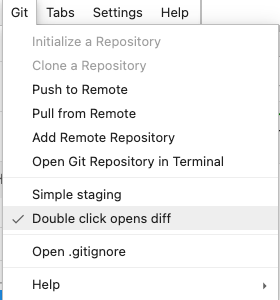
The diff screen of the file will open and show the changes made to the file. On the left is the HEAD panel
and on the right is the WORKING panel.
HEAD is the most current version of the file without the current changes you made. Areas where changes were made are
highlighted in red. If additions were made there will be green slashes on top of the red highlight.
If there were deletions they will be highlighted in darker red on top of the red highlight.
WORKING is the new version of the file. Areas where changes were made are
highlighted in green.

Undoing Changes#
Undoing changes can mean several things:
Discard- Undo changes made to the current unstaged fileAn unstaged file means this file has been changed since the last committed version and has not yet been staged.
To
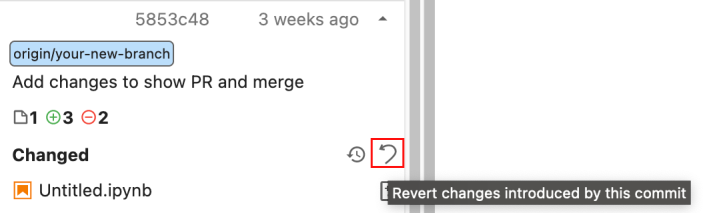
Discardthe current changes, right-click on the file while it is in theChangedsection. Then clickDiscard.Revert- Undo past changes made to a file in the commit historyTo
Revertpast changes click theHistorytab. Then click the title or the down arrow of the commit you want to revert. This will expand the commit information, and you will see additional buttons.
Then click the curved arrow to revert the changes for that particular commit.
Hard Reset- Undo all changes made after a certain pointUndoing changes made after a certain point means resetting the commit history to the chosen commit. Click the
Historytab. Then click the title or the down arrow of the commit you want to reset to. This will expand the commit information, and you will see additional buttons.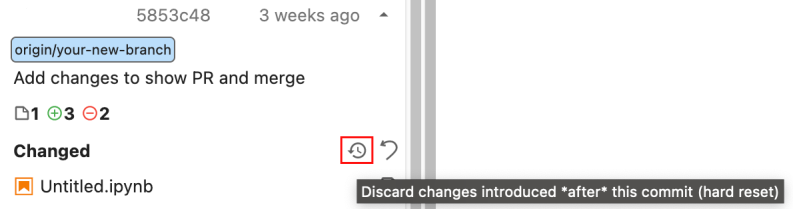
Click the button that has a clock inside a curved arrow.
Stashing Files#
Stashing a file means to temporarily store files you’re working on so the changes made to them will not affect other files, and changes to other files will not affect the working file. Stashing is typically done before switching branches, so the changes from other branches will not overwrite changes in files you are currently working on.
Currently, there is no mechanism in the GUI to stash files. Files can only be stashed from the Terminal.
Similarly, files can only be unstashed from the Terminal.
Once the command is run all files listed under Changed will be moved to the Stash and will not be seen.
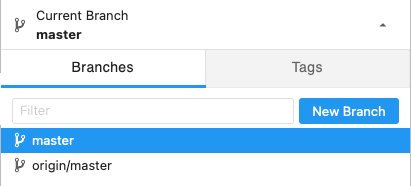
Creating a Branch#
Click the down arrow in the Current Branch section in the Git sidebar. It will reveal the Branches window and show all the created branches.
Click the New Branch button.
Fill out the form and input a branch name, and click which branch to base the new branch off of. After that click Create Branch.
It is good practice to not use spaces or special characters in the branch name other than dashes.
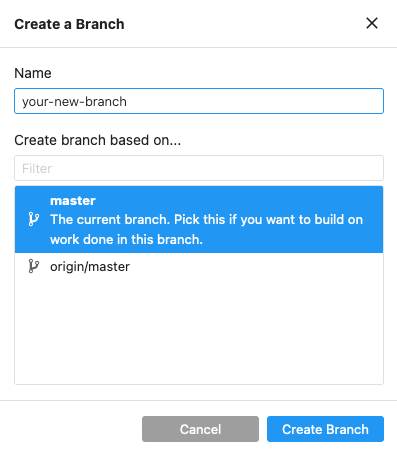
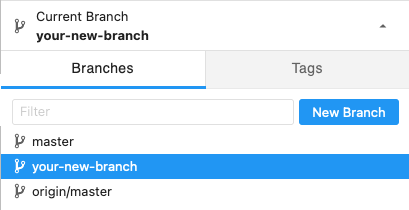
Git will automatically switch you into the new branch. Your newly created branch will be shown under Current Branch and be in the list of branches.
Switching Branches#
Note
You can only switch branches when you have no conflicts in files between the branches.
To switch branches simply click another branch listed under the Branches section.
Note
You can only switch to another local branch. Branches with the origin prefix are remote branches and cannot be switched into.
Using Git with the Terminal#
In this section are some useful Git commands. For more in-depth information take a look at the official Git documentation.
Set Up Your Git Identifier#
When you set up your Git Identifier your username and email will be shown with each commit you make. If you are working in a team this will show who made a certain commit.
git config --global user.name "Your Name"
git config --global user.email "email@email.com"
Staging a File#
A file can be staged whether you are in the same directory as the file or not.
To stage a file when you are in the same directory as the file, you use the command with only the filename.
git add <filename>
To stage a file when you are in a different directory as the file, you use the command with the folder path to the file.
git add /folder/path/to/file/<filename>
View Status#
The status command shows you the current status of your git repository. This includes information such as the current branch as well as staged and unstaged changes.
git status
Making a Commit#
Add a brief descriptive message about your commit.
git commit -m "your brief commit message goes here"
Pushing a Commit#
After your commit is complete, push it to the remote repository.
git push
If you want to push to a specific remote repository specify the name of the repository with the -u flag.
-u is the shorthand version of the flag --set-upstream.
git push -u remote-repository-name
You can also specify a specific branch to push to.
git push -u remote-repository-name remote-branch-name
View Commit History#
To see all the commits made in a repository use the log command.
git log
This will display a list of commits made. Each commit is uniquely identified with a long string of letters and numbers called a commit tag.
An example of a commit tag would be something like 4fe12bbf6227a2....
If you need to refer to a commit using the commit tag the entire tag does not need to be used, only the first 5-7 characters.
View the Changes Made Between Versions#
To view a comparison of the changes between versions of the same file run the diff command.
git diff
Undo Changes#
Undo changes in a single file, but keep it staged:
git checkout <commit tag> <filenames>
Revert changes in a single file:
git revert <commit tag>
Reset changes in a single file, but keep it unstaged:
git reset <commit tag> <filenames>
Stashing Files#
Running the stash command will stash all files that have changes made to them. These changed files will then not
interfere with other git operations such as switching branches.
git stash
You can also run the stash command if you are not in the same directory as the files.
git stash -- folder/path/to/file
To see a list of stashes you have made:
git stash list
To see the contents of your most recent stash run:
git stash show
To resume working on your stashed files you will need to get them out of the stash.
Run the following command and you will see them under the Changed section.
git stash pop
Note
This will only get the most recent stash.
Creating a Branch#
git branch <new-branch-name>
Creating a Branch That Tracks a Remote Branch#
A “tracking” branch is a local branch that has a direct connection to a remote branch. This allows you to use
simple commands such as git push without any specifying commands. Git automatically knows which server and branch
to push to.
To track a remote branch use the track command.
If you want the new local branch to have the same name as the remote branch use the following command.
git checkout --track origin/<remote-branch-name>
If you want to specify a different name for the local branch use the following command.
git branch --track <new-local-branch-name> origin/<remote-branch-name>
Switching Branches#
Note
You can only switch branches when you have no files that can cause a conflict between branches.
Switch branches by checking out the branch. Replace
git checkout <branch-name>
Note
You can only switch to another local branch. Branches with the origin prefix are remote branches and cannot be switched into.
Git Best Practices#
Organize with Branches#
Create a branch for each issue you’re working on. Have one for data ingestion, one for visualization, and one for bug fixes.
This keeps the workflow clean. If something went wrong you know which branch the changes came from.
Write Descriptive Commit Messages#
A good commit message documents the changes made in the commit so that when looking through the commits you can see the direction your work is going in.
Commit finished tasks only#
Each commit should be a completed logical chunk of the overall workflow. If you need to commit often, split up the workflow into smaller tasks.
Test code before committing#
Related to only committing finished tasks, test your code to ensure it does what it is intended to do before committing.
GitHub#
GitHub is one of the many online providers of free remote repository storage. This section will cover how to work with remote repositories in a Github context.
Creating a GitHub Account#
To begin using Git you need to create a free account on GitHub. Go to the GitHub website and follow the instructions to create an account.
Creating a Remote Repository#
After creating your account click Repository at the top menu and then New:


Fill the form with details of the repository and then click the Create Repository button at the bottom of the page.
Creating a Personal Access Token#
A Personal Access Token is used to authenticate the user when pushing files to the remote repository
Go to GitHub and log into your account.
Click on your account picture/avatar at the top left of the page, then navigate to Settings → Developer Settings → Personal Access Token → Tokens(classic). On this page, select the dropdown box named Generate new token and select Generate new token (classic). In the form that you are then presented with, choose an expiration date.The checkboxes on the form outline the scope the token is used to give access to. Check all the boxes you will need. Most people will need to check everything in the “repo” section.
The full scope of access the personal access token will allow depends on the role a person will take on in the project. Choose the scopes to allow as necessary.
Once you’re done checking the boxes, click Generate Token. Copy the generated token.
Note
The Personal Access Token will be shown only when it is created.
Whenever you push a commit, use the personal access token in place of a password when ask for your GitHub credentials.
Warning
Storing personal access tokens or SSH keys in a JupyterLab container poses security risks. It is recommended to store authentication credentials on your personal computer.
Creating a Pull Request#
A Pull Request is created when you want to merge your changes into the main branch. It also gives you a chance to let others know of the changes you made and ask them to review your changes.
A Pull Request is created from the GitHub site. After logging into GitHub, you may see a notification about a branch making recent pushes if you pushed recently.

Click the Compare & pull request button.
If you don’t see a notification, click the Pull Request menu button and then the New Pull Request button on the following page.


You’ll be taken to the Open a pull request page.
Here, make sure the base is set to main and the compare is set to the branch you want to compare the main branch with.

Fill out the form and provide a title and description of the changes made.
If you have someone who can review your pull request, on the right side of the screen click the cog icon under the Reviewers section, and select their name.

Then click the Create Pull Request button.
Merging Your Branch#
Merging branches is done on the GitHub site.
After your Pull Request has been approved (and reviewed, if needed), the Merge button will turn green
