
Users#
Although the Marble network is a distributed system across multiple nodes, users need to register with one node in the network that then becomes their “home node”. A user’s home node is responsible for hosting that user’s login credentials and is used to verify that user’s identity across the network.
This means that as a node admin, you will be responsible for accepting users who want to sign up to your node and managing their information and credentials.
You are also responsible for deciding which users have permission to access which services.
User and permission management is all performed with Marble’s authentication and authorization software, a service
called Magpie. Magpie is always enabled and no additional steps are required to
enable the Magpie service. The Magpie service is available on your node by navigating to
https://<your-node-url>/magpie (where <your-node-url> is replaced by the actual URL of your node).
Magpie#
Magpie is an authentication and authorization service that you can use to manage your user data and configure access permissions for your node.
Magpie was specifically designed with climate science and earth observation applications in mind and so can be used to manage permissions to services that use familiar APIs like WPS and OGC API - Features.
All the operations described below require administrator access to complete. To log in to Magpie as an administrator user:
Navigate to
https://<your-node-url>/magpie(where<your-node-url>is replaced by the actual URL of your node).Sign in with the magpie admin username and password that you set when setting up your node. These are defined in the
env.localfile as theMAGPIE_ADMIN_USERNAMEandMAGPIE_ADMIN_PASSWORDvariables.
Users#
Accepting New Users#
To add a new user to your node. Click the “Edit Users” button:
Followed by the “Add User” button at the top of the Users table:

Here you will see a form to add a new user to your node:
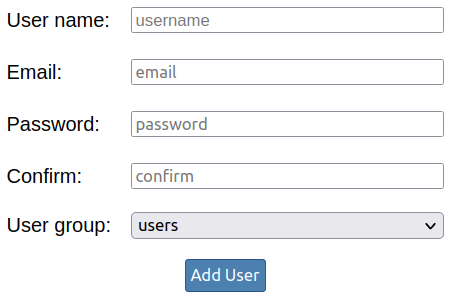
The “User name” and “Email” values must be unique and cannot include some special characters. The “Password” value must be at least 12 characters long by default.
You also need to choose which group to add the new user by default. In general, we recommend adding new users to the “Users” group but see the section on groups for other options.
Once you’ve added a new user you should let the user know that you’ve set up their account and provide them their password.
Tip
You should encourage all new users to log in and change their password as soon as possible after their account has been created.
Note
You can choose to allow anyone to sign up to your node without any intervention on your part. This can be done by
setting the
MAGPIE_USER_REGISTRATION_ENABLED
variable to True in the env.local file.
If you do this, we recommend monitoring your node closely to ensure that your node’s resources are not over-taxed if too many users are logged in at once.
Updating User Data#
In general, we don’t recommend changing a user’s password, or email address yourself. Instead, encourage your users to manage this information themselves.
However, you can edit this information by logging in to Magpie and clicking the “Edit Users” button to get to the user’s information page:
Then select the user you would like to edit from the table and click the “Edit” button (in the “Action” column). Select one of the “Edit” buttons beside the Username, Password, or Email fields and change the value as desired. When finished, click the “Save” button to save the changes.
Warning
If you change any of the values above, make sure you tell the user that their information has changed. Usernames, email addresses, and passwords can all be used to log in to Marble. If you change this without telling the user, they will not have the correct credentials to log in anymore.
Removing Users#
To remove a user from the system, navigate to the user’s information page and click the “Delete” button:

You will be asked to confirm whether you actually want to delete the user before continuing.
User Groups#
Sorting users into groups will make it easier to manage permissions for multiple users at once. Service permissions can then be applied to a whole group of users instead of having to update permissions for each user individually.
Add a User to a Group#
To add a user to a group navigate to the user’s information page and select the checkbox in the “Group Membership” table. A user can belong to multiple groups simultaneously and the permission rules for each group will be combined to determine the user’s effective permissions for a given resource.
Create a User Group#
To create a user group first click the “Edit Groups” button on the Magpie landing page:
Followed by the “Add Group” button at the top of the Users table:

Here you will see a form to add a new user to your node:
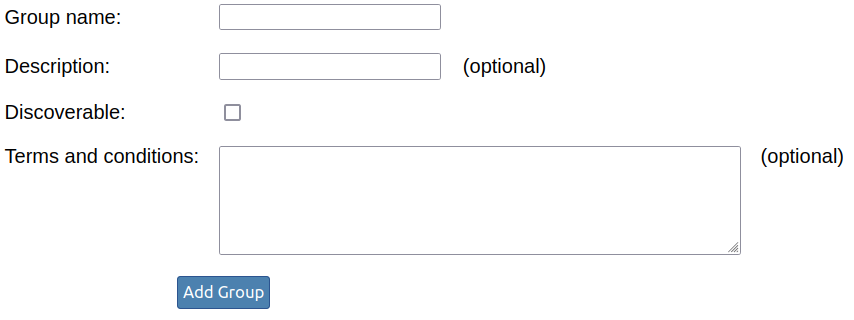
The “Group name” value must be unique. If you choose to make the group discoverable, it’s name and description will be visible to all users. Otherwise, it will only be visible to administrator users.
Note
An administrator user can add any user to any group, whether the group is “discoverable” or not.
If you would like the user to have to agree to some terms and conditions before joining the group, you can add those to the “Terms and conditions” field. This is useful, for example, when members of this group are given access to a resource that requires a special licensing agreement.
Note
Magpie asks users to accept terms and conditions by sending them an email. This means that you must configure Magpie to be able to send emails via an SMTP server.
To do so, ensure that all of the
MAGPIE_SMTP_* variables are
set in the env.local file.
Update a User Group#
You can edit this information by logging in to Magpie and clicking the “Edit Groups” button to get to the user’s information page:
Then select the group you would like to edit from the table and click the “Edit” button (in the “Action” column). Select one of the “Edit” buttons beside the Name, Description, or Discoverable fields and change the value as desired. When finished, click the “Save” button to save the changes.
Removing User Groups#
To delete a user group, navigate to the group’s information page and click the “Delete” button:
You will be asked to confirm whether you actually want to delete the group before continuing.
Note
Deleting a group will not delete any users in the group. Those users will simply no longer be associated with the deleted group.
Builtin Groups#
You may notice that there are several groups that exist already in the system. These groups are pre-created with specific permissions already set up. Feel free to add any users that you would like to these groups as you see fit.
Caution
We do not recommend editing or deleting any of these groups unless you really know what you’re doing.
The builtin groups are as follows:
administrators#
Members of this group have full access to everything on the Marble node! This includes full access to Magpie itself which allows users in this group to manage other user’s permissions and credentials.
We recommend not adding any users to this group. If you need full access to Magpie, you should log in as the administrator user (who is always a member of this group).
anonymous#
This is a group that allows you to configure permissions for visitors to your node that have not actually logged in to your node. Anyone who visits your node without logging in will have the same access as members of this group.
This allows you to make part of your node publicly available, meaning a login is not required to access that resource.
users#
This is a group that can be used to include every user with an account on your node. This group does not necessarily have any special permissions by default, but it is a useful way to update permissions for all users at once.
In order to make use of this group, we recommend adding every new user to this group when they are added to the node.
stac-admin#
Members of this group will have full read and write permissions to the STAC catalog. Add users to this group who will need to update or manage the catalog.
monitoring#
Members of this group will have full access to the Grafana and Prometheus monitoring components.
This group is useful if you want to allow a user to be able to view sensitive monitoring data about your node without giving them full administrator permissions.
Service Permissions#
Marble services are user facing tools that are deployed with the Marble software stack. Because they are user facing, you will likely want to configure which services are available to which users.
As a first step you will want to decide which resources are accessible by users with accounts on your node (those in the users group), and which will by publicly available (as defined by the anonymous group).
Then you can add more groups and permission rules as you see fit. Some examples:
you want to host and serve some data that requires users to agree to terms and conditions before they get access.
you only want to provide access to the IDE to some users but not others.
you only want to allow some users to be able to create new remote processing workflows.
Managing Service Permissions#
To edit service permissions with Magpie, click the “Edit Services” button:

This page shows each of the available service types:

Here we will discuss the service types that are the most relevant for the Marble software. For a full description of all service types available through Magpie, see the Magpie documentation.
api#
This service type allows you to define access rules based on URL path segments.
For example, the STAC service has the following endpoints:
stac/
stac/collections
stac/search
etc.
And you can define an access rule for each!
Permissions for api services can either be:
read: allow/deny users to make GET and HEAD requests to the endpointwrite: allow/deny users to make all other requests methods to the endpoint
geoserver#
This service type is used to apply permissions for the GeoServer service.
This service type will only be used if the included GeoServer component is enabled.
The GeoServer service type is a combination of the api, wps, and wfs service types since the GeoServer service provides a UI interface as well as OGC interfaces such as WPS and WFS.
Permissions for GeoServer services can be read and write like the api type but can also
include permissions for each of the GeoServer operations.
For a list of GeoServer operations and their description please refer to the GeoServer documentation for:
thredds#
This service type is used to apply permissions for the THREDDS service.
This service type will only be used if the included THREDDS component is enabled.
Permissions for THREDDS services can either be:
read: allow/deny users to download datawrite: only for use by external APIs (see the documentation for details)browse: allow/deny users to view metadata
Managing Child Resource Permissions#
Some service types allow you to define additional rules for child resources. This allows you to fine tune exactly which permissions are applied to which parts of each service.
For example, an api service type can have different permissions for each path segment. We can create a permission for
stac/ route as well as the stac/search route and apply different rules for each.
To create a child resource, click the “Edit” button (in the “Action” column of the Services table). Under resources, click the “Add child” button and fill in the form and click “Add”.
Permission Rules for Groups and Users#
Once the service permissions have been created, you’ll want to apply different rules for different groups or users.
Navigate to either the group’s information page or the user’s information page and select the service type you would like to modify from the “Permissions” table.
Select which resource you’d like to modify and change the permission type for that row by selecting one of the options from the dropdown menu.
The options are:
Allow, Recursive: allows the user access to this resource and any child resource
Allow, Match: allows the user access to this resource but not any child resource
Deny, Recursive: denies the user access to this resource and any child resource
Deny, Match: denies the user access to this resource but not any child resource
If the option is left blank then there is no explicit rule applied to this resource, access will be determined based on whether a recursive rule was applied to a parent resource.
Make sure to click the “Apply Permissions” button to save your changes.
Effective permissions#
Users can belong to multiple groups which may have different permission rules applied. This can make it complicated to determine which permissions a specific user has when all the various rules are applied across groups.
The permissions that are actually applied for a given user are called their “effective permissions”.
To inspect the user’s effective permissions, navigate to the user’s information page and select a permission type from the “Permissions” table. Then check the checkbox labeled “View inherited group permissions and effective user permissions”.